Scooter Compression Systems Overview

Stunt scooter compression systems are crucial for your setup. These systems ensure that your bar, headset, and fork are securely connected. If you're a beginner or an intermediate rider in search of a new compression kit, this guide provides an opportunity to grasp the fundamental aspects of stunt scooter compression.
We'll delve into the advantages and disadvantages of the most prevalent compression systems and examine their compatibility with various scooter parts. By the conclusion, you'll have a clear understanding of which type of compression suits your needs and how to optimise your stunt scooter.
SCS Compression System

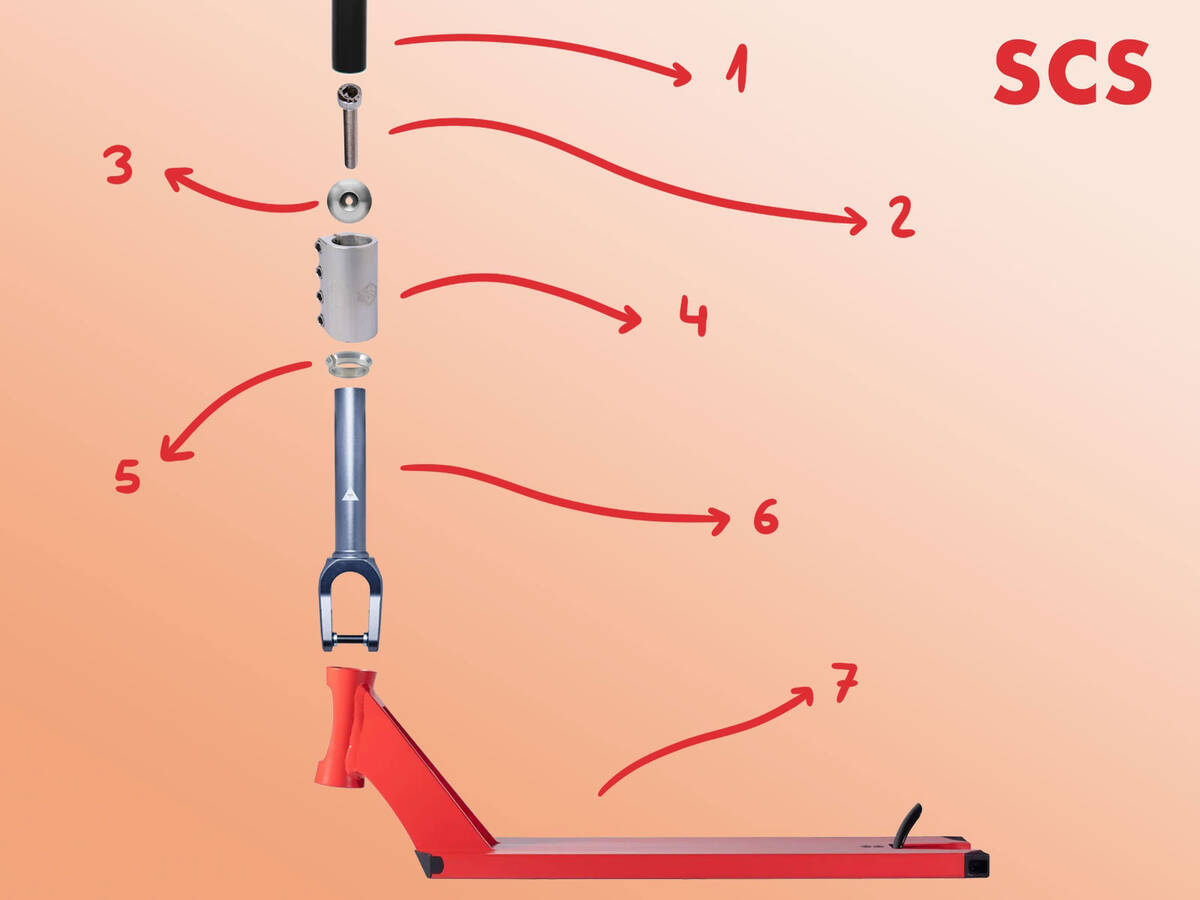
1: Bar (without slit) 2: Compression Bolt 3: Top Cap 4: SCS Clamp 5: C-Ring 6: Fork 7: Deck (headtube & headset)
SCS stands for Standard Compression System. This system is celebrated for its durability and straightforwardness, making it ideal for intensive use. Though slightly heavier, SCS compression is potentially the most robust system and is compatible with both standard and oversized bars, which is an added benefit.
Installing SCS Compression
To install, a clamp attaches to the fork with an internal compression bolt that presses a top cap against the inside edge of the clamp. This bolt connects to a starnut or a built-in thread within the fork (most modern SCS forks come with built-in threads). To secure the bar, the clamp is tightened using four bolts.
Watch the video below for guidance on installing SCS compression:
Bars Suitable for SCS
For an SCS configuration, choose a bar without a slit at the bottom to prevent damage, as the clamp will squeeze the slit. Options include trimming the bar to remove the slit or finding a suitable SCS bar adapter.
Clamps Compatible with SCS
For SCS, an SCS clamp is necessary since the compression system is integrated into the clamp. Ensure the inner diameter of the clamp matches the outer diameter of your bars – either standard 32 mm or oversized 35 mm.
Note: If the inner ledge of the SCS clamp is not higher than the top of the fork, achieving a solid connection between the clamp and fork is not possible. A headset spacer can be used to correct this.
Forks Compatible with SCS
Both HIC and SCS forks work with SCS compression (there are no differences between the two).
HIC Compression System

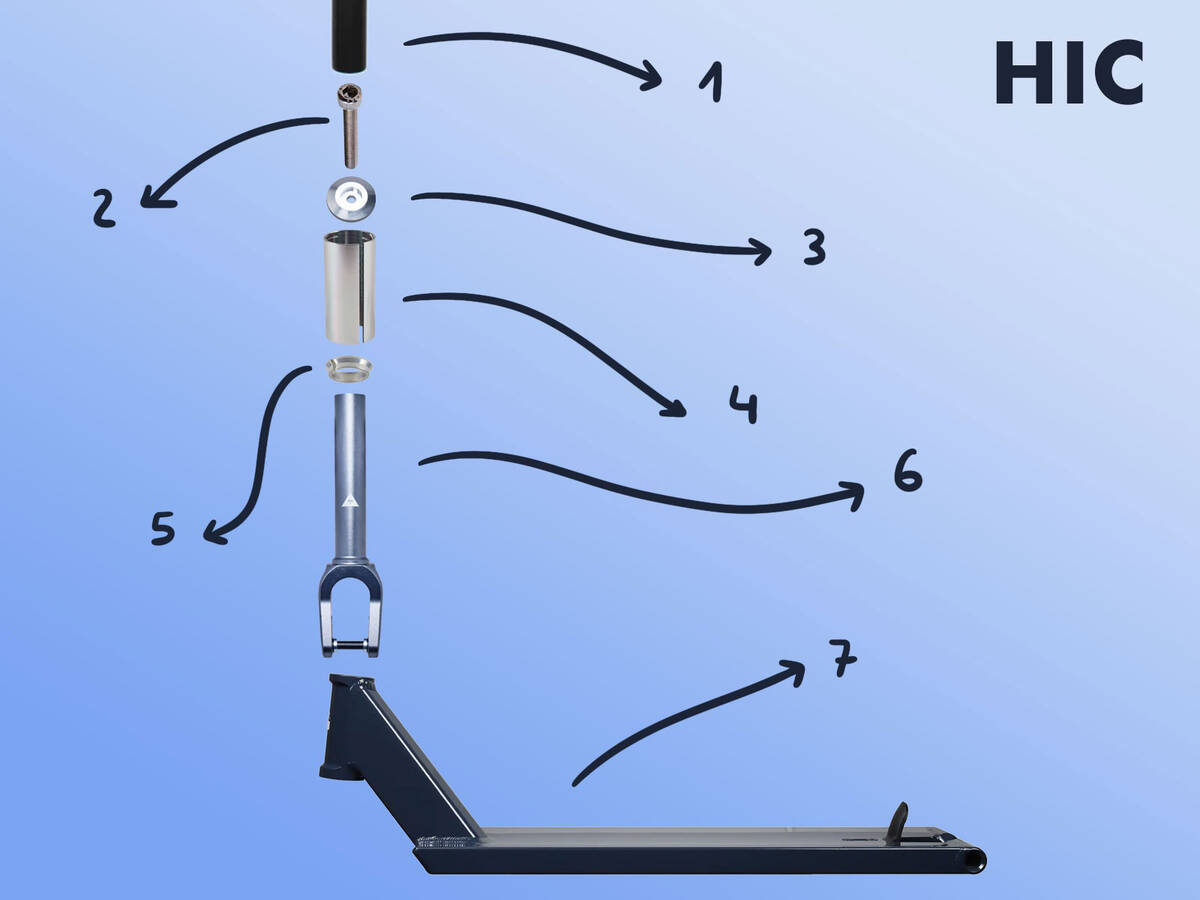
1. Bar 2. Compression Bolt 3. Top Cap 4. IHC Shim 5. C-Ring 6. Fork 7. Deck (headtube & headset)
HIC, which stands for Hidden Internal Compression, while not the lightest available, is appreciated for being lighter than SCS and relatively easy to assemble. However, HIC necessitates a bar with a slit, introducing a weak point not found in the sturdier SCS compression.
Installing HIC Compression
An HIC shim mounts onto the fork, and a compression bolt with a top cap secures the shim to the deck's headtube, holding the fork firmly. The bar is then clamped tightly around the fork tube.
Watch the video below to learn how to assemble an HIC compression system:
HIC-Compatible Bars
HIC bars have an internal diameter of 32 mm and an external diameter of 35 mm, constructed from durable materials like steel or titanium. Aluminium bars possess an oversized external diameter but have a smaller internal diameter due to the need for thicker tubing for durability. Hence, aluminium bars aren't suitable for an HIC setup. HIC bars include a bottom slit.
Clamps Suitable for HIC
Your HIC clamp needs to completely cover the slit in the bar. If purchasing a clamp for your HIC setup, it should have a 35 mm (oversized) inner diameter.
Forks Compatible with HIC
HIC/SCS forks are designed for use with the HIC compression system.
Note: To address potential issues, an HIC spacer should be placed before fitting the shim onto the fork, which is crucial for ensuring optimal compression and solidifying your setup.
IHC Compression System

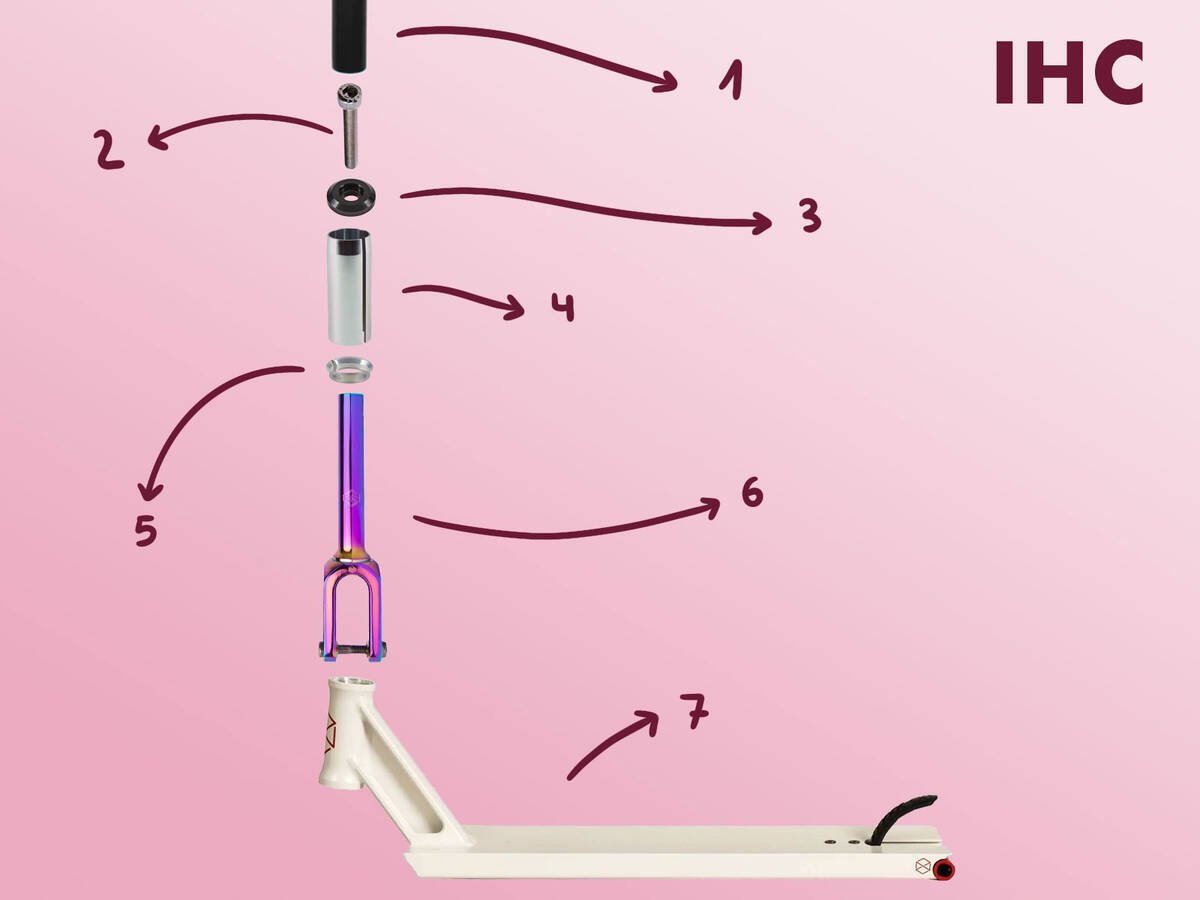
1. Bar 2. Compression Bolt 3. Top Cap 4. IHC Shim 5. C-Ring 6. Fork 7. Deck (headtube & headset)
IHC, known as Internal Hidden Compression, shares similarities with HIC. Its primary advantage is generating a lightweight setup with dependable compression.
The key difference between IHC and HIC is the slender shaft or fork tube in IHC forks, allowing it to be used with bars of a 28 mm internal diameter. Consequently, aluminium bars with a standard 28 mm inner diameter and a 35 mm outer diameter are compatible.
Installing IHC Compression
An IHC compression ring is fitted within the headset bearing to accommodate the thinner fork tube, preventing any play between the fork and headset bearing.
Afterwards, an IHC shim is fitted onto the fork tube, followed by a top cap placement. The compression bolt threads into the fork’s internal threads, pressing the top cap down and establishing compression when tightened.
Watch the video to see how IHC compression is mounted:
Suitable Bars for IHC
IHC can be used with any bars having a 28 mm internal diameter and a slit at the bottom.
While IHC fits bars with a standard 28 mm internal diameter and a bottom slit, if you wish to use an oversized steel or titanium bar with IHC forks, an adapter for the larger internal diameter is required.
Clamps Suitable for IHC
Make sure the clamp’s internal diameter aligns with your bar’s outer diameter.
Forks Designed for IHC
IHC forks are essential for IHC compression, featuring slim shafts for weight reduction. Unlike HIC, IHC forks are suitable for bars with standard 28 mm internal diameters.
Note: The IHC shim must extend beyond the end of the fork tube coming out of the headtube. Failure to do so prevents proper compression. If necessary, use a headset spacer for correct tightening.
ICS Compression System
ICS, meaning Inverted/Internal Compression System, is distinct for being lightweight and economical. It demands the fewest parts for assembly compared to other compression systems.
The challenges with ICS are tied to its installation and maintenance, which may be arduous. Though attractive for park riders adept at landing softly, ICS lacks the durability of SCS.
How to Install ICS Compression
In ICS, a bolt passes through the fork from below. The bolt’s protruding segment threads into a starnut within the bar. ICS utilises the least number of parts compared to other systems.
The process for installation and maintenance can be troublesome. For example, to adjust the compression bolt, the front wheel must be removed and unscrew the bolt entirely if removing the bar.
Here's a video showing the installation of ICS compression:
Suitable Bars for ICS Compression
ICS compression relies on a starnut securing itself inside the bar. With steel and titanium bars, their smooth, hard surface can cause a starnut to slide, loosening compression. Aluminium is softer, providing a better grip for starnuts.
Thus, for ICS compression, using an aluminium bar or a bar with an integral starnut is advised.
ICS bars generally feature a 28 mm internal diameter and a bottom slit, akin to IHC and HIC bars. The outer diameter varies from 32 mm to 35 mm, so ensure your clamp’s inner diameter matches your bar's external diameter.
ICS-10 Compression System
ICS-10 is much like the standard ICS, with the sole distinction being the thread size of the compression bolt.
ICS-10 compression bolts use M10 threads, while regular ICS uses M6 threads.
The thicker M10 bolts provide slightly more robustness than the thinner M6 bolts.
Check out the video below to see how ICS-10 compression is installed:
Video Overview of Compression Systems
Explore this video, rich with expert knowledge about scooter compression. It includes information on SCS, HIC, IHC, and ICS-10 compression systems.
